Showing posts with label glitter. Show all posts

Monday, April 9, 2012

Fresh Frog of Bel Air by OPI and Midnight by Love and Beauty


This was my Engagement Pictures Round 2 manicure. My wedding colors are eggplant, emerald, and sapphire, so when I dreamt up this combo I couldn't get over how perfect it was. This picture shows three coats each of the glitters covered by "Matte About You" by Essie. I used this matte top coat in order to tone down the flash a little bit so my nails wouldn't steal the show. I love the final product. This was also my first experience with the Love & Beauty brand (purchased at Forever 21), and I was pleased with the quality. The glitter matched OPI's in color, shape, size, and durability, and it was a fourth of the price! Overall, both colors dazzled me and added a fun pop to the engagement pictures (seen below!). 


Frenzy by Sinful Colors


This honestly might be one of my top manicures ever. I began with a base of Xpress Nails "Black Out" and DL "Between the Sheets," and topped them both with the gorgeous sparkle blend from Sinful Colors. I used two coats of the glitter to really make it pop. I love manicures like this because the accent nail adds diversity, but the glitter provides unity to the look. I don't have much experience with the Sinful Colors brand, but this polish held up for a week and a half--I loved it so much that I just couldn't bring myself to take it off. I'm excited to play around with other combos for this color, and even try it solo. 

Rating: A+++++

Monday, February 6, 2012

Bumster by Butter London


Today's color is very dear to my heart, because it is actually my first attempt at yellow. As we all know yellows can be scary and sometimes impossible to pull off. Unless you've been blessed with a perfect yellow-friendly skin tone, finding the right shade can be a nightmare. So as you can imagine, when I found this warm golden hue I was nearly ecstatic. Butter has never led my astray before, and this was no exception to the rule. 

The color itself can be seen on my pinkie, ring finger, and thumb. My index finger is sporting OPI's You Don't Know Jacques, and my middle finger features many layers of my custom copper glitter which I layered on top of the other colors as well. The application was hassle free, and I achieved total opacity with just two coats. Not too dark, not too light, and not a single streak in sight--is this the perfect yellow, or what??

Rating: A+

Wednesday, February 1, 2012

Excuse Moi! and Pepe's Purple Passion by OPI


Two add to my family of Muppets polishes, I received these two impossibly sparkly colors as Christmas gifts. Excuse Moi! is a deep pink based glitter with flecks of purple and silver. The overall effect has a lot of depth; this is something that can sometimes be missing from polishes made entirely of sparkle. Pepe's Purple Passion is equally unique in that it appears purple, but it has flecks of pink glitter throughout. They had hardly been seen in the picture, but in the sunlight they appear to be almost the same shade that is found in Excuse Moi!. These colors were perfect together, and made for a nice change from all the Christmas-themed hues. 

Excuse Moi!: B+
Pepe's Purple Passion: B 

Tuesday, January 17, 2012

Custom Glitter Franken


Another one of my spur of the moment glitter concoctions, this combination of black, silver, and copper glitter turned out better then I'd hoped. I initially feared that the overwhelming black glitter would be too harsh, but I love the finished product. This picture shows three coats of the polish in direct sunlight. It reminds me a bit of OPI's Metallic 4 Life in the newest Nicki Manaj collection, but the glitter in mine is much more fine. 

Rating: B+

Tuesday, December 6, 2011

Mix & Match: Gold and Copper


After staring at my bottles of custom glitter for almost a full 24 hours, I caved and just had to try them out. I was already wearing Ulta's Gentle Ginger so the copper sparkles were a perfect fit. The polish applied easily, and the fine glitter didn't cause an uneven finish like some sparkly shades do. The mixture of copper and gold is so eye-catching, and I can't think of anything better to get me through these endless days of writing papers.

Sunday, December 4, 2011

Glitter Frankens

Last Christmas I gave nearly every female in my life custom frankened nail polishes. Then today, while I was supposed to be writing a paper, I was struck with the brilliant idea of frankening my own glitter polishes. I mean, there's no such thing as too much glitter, and how great would it be to able to specifically select my own color combinations?? Turns out, it's pretty freaking great.

It being Sunday night, Michael's and Sally's were both closed by the time I went out to buy supplies. That meant I was stuck with the selection at Target. I was stoked about being able to find bottles of clear polish for just $2.50 (Xpress Nails), but a little bit less than stoked about the lacking choices of glitter. I settled on a pack of six tubes (copper, gold, white, silver, and black) that was just $3.80. As you can tell, one of the biggest draws to this idea is the affordability. When I got home I got right to experimenting, and I made sure to capture every step!

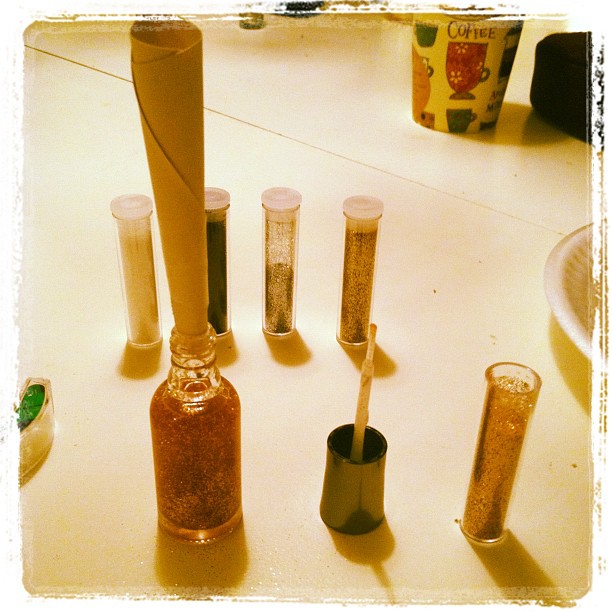
Step 1: The supplies

glitters, clear polishes, index card, Scotch tape


Step 2: The funnel
Use the index card and Scotch tape to create a funnel that will fit into the mouth of your polish bottle. This gives total control of how much glitter you put in at one time.


Step 3: Setting up
Take your brush out, making sure to get as much excess polish off as possible and set it aside. Then fit your funnel securely into the bottle. Select your glitter start adding in small intervals. 


Step 4: Shake, shake, shake
After each little bit you add, put the top back on and give the bottle a good shaking. Mixing progressively like this makes it easier when your bottle is entirely filled with glitter. This is especially important if you'll be using more than one color of glitter. 


Step 5: Having gorgeous new glitters
These are my finished products. The bottle on the left is just copper glitter; I used less glitter in this bottle so that I could use it to layer with other polishes. The one on the right is a combination of black, silver, and copper. I absolutely love how they both turned out and I can't wait to wear them.

Wednesday, November 30, 2011

Divine Swine by OPI


This gorgeous color, part of OPI's brand new Muppets Collections, is made entirely of magenta and silver pieces of glitter. The clear base allows the smaller flecks of color and bigger pieces of silver to go perfectly over a color or create a statement all their own. This picture is taken in the sunlight, so the sparkle can really be seen, and features three coats of the polish. The coverage is surprisingly good for a glitter, but the removal is just as much a pain as glitter polish has ever been.

Rating: A-